The Python GTK+ 3 Tutorial【5. Widget Gallery】は使用可能なウィジェットとそのサンプル画像が列挙されています。翻訳する部分がないので、この章は飛ばします。
The Python GTK+ 3 Tutorial【6. Layout Containers】から本格的にGUIプログラミングの勉強が始まりそうです。この章は長いので前半(Boxes / Grid / ListBox)と後半に分けて勉強します。
多くのGUIツールキットでは、絶対位置を使用してウィンドウ内に正確にウィジェットを配置する必要がありますが、GTK+では異なるアプローチを使用しています。ウィンドウ内の各ウィジェットの位置とサイズを指定するのではなく、行、列、テーブルにウィジェットを配置することができます。ウィンドウのサイズは、含まれるウィジェットのサイズに基づいて自動的に決定されます。ウィジェットのサイズは、含まれるテキストの量、指定した最小と最大のサイズ、および/またはウィジェットのセット間で利用可能なスペースを共有するように要求した方法によって決定されます。各ウィジェットにパディング距離とセンタリング値を指定することで、レイアウトを完璧に仕上げることができます。GTK+ はこの情報をすべて使用して、ユーザーがウィンドウを操作する時に、すべてのサイズを変更したり配置を変更したりします。
GTK+ は、コンテナを使ってウィジェットを階層的に配置します。コンテナはエンドユーザからは見えず、ウィンドウに挿入されたり、コンポーネントをレイアウトするためにお互いの中に配置されたりします。コンテナには二つの種類があります: シングルチャイルド・コンテナ (すべて Gtk.Bin の子孫) とマルチチャイルド・コンテナ (Gtk.Container の子孫) です。最も一般的に使われるのは、縦または横のボックス (Gtk.Box) とグリッド (Gtk.Grid) です。
6.1. ボックス
ボックスは目に見えないコンテナで、ウィジェットを詰め込むことができます。水平なボックスにウィジェットを詰め込む場合、Gtk.Box.pack_start() と Gtk.Box.pack_end() のどちらかを使うかによって、オブジェクトは左から右へ、または右から左へと水平に挿入されます。縦長のボックスでは、ウィジェットは上から下に、またはその逆に詰められます。他のボックスの内側や横にあるボックスを自由に組み合わせて、目的の効果を得ることができます。
6.1.1. 例
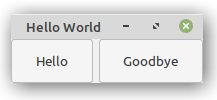
「クラスを使ったサンプル」を少し修正して2個のボタンをつけた例を見てみましょう。

# tut06-01.py
# 2個のボタンを持つボックスの例

import gi

gi.require_version("Gtk", "3.0")
from gi.repository import Gtk


class MyWindow(Gtk.Window):
    def __init__(self):
        Gtk.Window.__init__(self, title="Hello World")

        # 水平方向のボックスコンテナを作成します。各ボックス間が6ピクセルになるように配置されます。
        # このボックスはトップレベルのウィンドウの子になります。
        self.box = Gtk.Box(spacing=6)
        self.add(self.box)

        # 続いて、ボックスコンテナに2つの異なるボタンを追加します。
        self.button1 = Gtk.Button(label="Hello")
        self.button1.connect("clicked", self.on_button1_clicked)
        self.box.pack_start(self.button1, True, True, 0)

        self.button2 = Gtk.Button(label="Goodbye")
        self.button2.connect("clicked", self.on_button2_clicked)
        self.box.pack_start(self.button2, True, True, 0)

    def on_button1_clicked(self, widget):
        print("Hello")

    def on_button2_clicked(self, widget):
        print("Goodbye")


win = MyWindow()
win.connect("destroy", Gtk.main_quit)
win.show_all()
Gtk.main()
Gtk.Box.pack_start() ではウィジェットは左から右に配置されますが、Gtk.Box.pack_end()では右から左に配置されます。
6.2. グリッド
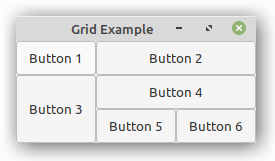
Gtk.Grid は子ウィジェットを行と列に配置するコンテナですが、コンストラクタで寸法を指定する必要はありません。子ウィジェットは Gtk.Grid.attach() を使って追加されます。子ウィジェットは複数の行や列にまたがることができます。Gtk.Grid.attach(child, left, top, width, height) メソッドは5つのパラメータを持ちます。
- child パラメータは子を追加する Gtk.Widget です。
- left は 対象の child の左側につくる列の数です。
- top は child の上につくる行の数を示します。
- width と height はそれぞれ子がスパンする列と行の数を示します。
また、Gtk.Grid.attach_next_to(child, sibling, side, width, height) を用いて、既存の子の隣に子を追加することも可能です。これにも5つのパラメータがあります。
- child は上記のように子を追加する Gtk.Widget です。
- sibling は self (Gtk.Gridのインスタンス) または None の既存の子ウィジェットです。次の子ウィジェットは sibling の隣に配置されます。 sibling が None の場合はグリッドの先頭か末尾に配置されます。
- side は、 Gtk.PositionType を指定する引数で、子ウィジェットのどの側面に配置されるかを示します。
- width と height はそれぞれ子ウィジェットがスパンする列と行の数を示します。
最後に、Gtk.Grid は Gtk.Grid.add() を使うだけで Gtk.Box のように使うことができ、“orientation"プロパティ(デフォルトは Gtk.Orientation.HORIZONTAL )で指定された方向に子を隣り合わせに配置します。
6.2.1. 例

# tut06-02.py
# グリッドの例

import gi

gi.require_version("Gtk", "3.0")
from gi.repository import Gtk


class GridWindow(Gtk.Window):
    def __init__(self):
        Gtk.Window.__init__(self, title="Grid Example")

        grid = Gtk.Grid()
        self.add(grid)

        button1 = Gtk.Button(label="Button 1")
        button2 = Gtk.Button(label="Button 2")
        button3 = Gtk.Button(label="Button 3")
        button4 = Gtk.Button(label="Button 4")
        button5 = Gtk.Button(label="Button 5")
        button6 = Gtk.Button(label="Button 6")

        grid.add(button1)
        grid.attach(button2, 1, 0, 2, 1)
        grid.attach_next_to(button3, button1, Gtk.PositionType.BOTTOM, 1, 2)
        grid.attach_next_to(button4, button3, Gtk.PositionType.RIGHT, 2, 1)
        grid.attach(button5, 1, 2, 1, 1)
        grid.attach_next_to(button6, button5, Gtk.PositionType.RIGHT, 1, 1)


win = GridWindow()
win.connect("destroy", Gtk.main_quit)
win.show_all()
Gtk.main()
筆者つぶやき ▶▶▶ スパンって苦手…。HTMLの<table>をレイアウトに使っていた時代を思い出します。
6.3. リストボックス
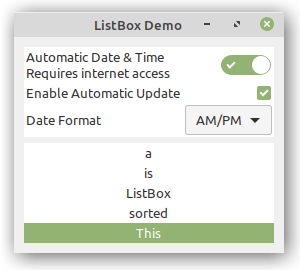
Gtk.ListBox は、子としてGtk.ListBoxRow を含む縦型のコンテナです。これらの行は動的なソートやフィルタリングが可能で、行の内容に応じてヘッダを動的に追加することができます。また、一般的なリストのようにキーボードやマウスでのナビゲーションや選択も可能です。
Gtk.ListBox は、Gtk.TreeView の代わりに使われることが多いです。特にリストの内容が Gtk.CellRenderer で許可されているものよりも複雑なレイアウトの場合や、コンテンツがインタラクティブな場合 (ボタンがある場合など) には、Gtk.ListBox が使えます。
Gtk.ListBox は子として Gtk.ListBoxRow だけを持ちますが、Gtk.Container.add() を介して任意の種類のウィジェットが追加できます。その場合 Gtk.ListBoxRow がリストとウィジェットの間に自動的に挿入されます。
6.3.1. 例

# tut06-03.py
# リストボックスの例

import gi

gi.require_version("Gtk", "3.0")
from gi.repository import Gtk


class ListBoxRowWithData(Gtk.ListBoxRow):
    def __init__(self, data):
        super(Gtk.ListBoxRow, self).__init__()
        self.data = data
        self.add(Gtk.Label(data))


class ListBoxWindow(Gtk.Window):
    def __init__(self):
        Gtk.Window.__init__(self, title="ListBox Demo")
        self.set_border_width(10)

        box_outer = Gtk.Box(orientation=Gtk.Orientation.VERTICAL, spacing=6)
        self.add(box_outer)

        listbox = Gtk.ListBox()
        listbox.set_selection_mode(Gtk.SelectionMode.NONE)
        box_outer.pack_start(listbox, True, True, 0)

        row = Gtk.ListBoxRow()
        hbox = Gtk.Box(orientation=Gtk.Orientation.HORIZONTAL, spacing=50)
        row.add(hbox)
        vbox = Gtk.Box(orientation=Gtk.Orientation.VERTICAL)
        hbox.pack_start(vbox, True, True, 0)

        label1 = Gtk.Label("Automatic Date & Time", xalign=0)
        label2 = Gtk.Label("Requires internet access", xalign=0)
        vbox.pack_start(label1, True, True, 0)
        vbox.pack_start(label2, True, True, 0)

        switch = Gtk.Switch()
        switch.props.valign = Gtk.Align.CENTER
        hbox.pack_start(switch, False, True, 0)

        listbox.add(row)

        row = Gtk.ListBoxRow()
        hbox = Gtk.Box(orientation=Gtk.Orientation.HORIZONTAL, spacing=50)
        row.add(hbox)
        label = Gtk.Label("Enable Automatic Update", xalign=0)
        check = Gtk.CheckButton()
        hbox.pack_start(label, True, True, 0)
        hbox.pack_start(check, False, True, 0)

        listbox.add(row)

        row = Gtk.ListBoxRow()
        hbox = Gtk.Box(orientation=Gtk.Orientation.HORIZONTAL, spacing=50)
        row.add(hbox)
        label = Gtk.Label("Date Format", xalign=0)
        combo = Gtk.ComboBoxText()
        combo.insert(0, "0", "24-hour")
        combo.insert(1, "1", "AM/PM")
        hbox.pack_start(label, True, True, 0)
        hbox.pack_start(combo, False, True, 0)

        listbox.add(row)

        listbox_2 = Gtk.ListBox()
        items = "This is a sorted ListBox Fail".split()

        for item in items:
            listbox_2.add(ListBoxRowWithData(item))

        def sort_func(row_1, row_2, data, notify_destroy):
            return row_1.data.lower() > row_2.data.lower()

        def filter_func(row, data, notify_destroy):
            return False if row.data == "Fail" else True

        listbox_2.set_sort_func(sort_func, None, False)
        listbox_2.set_filter_func(filter_func, None, False)

        def on_row_activated(listbox_widget, row):
            print(row.data)

        listbox_2.connect("row-activated", on_row_activated)

        box_outer.pack_start(listbox_2, True, True, 0)
        listbox_2.show_all()


win = ListBoxWindow()
win.connect("destroy", Gtk.main_quit)
win.show_all()
Gtk.main()
筆者つぶやき ▶▶▶ だんだんついて行けない気がしてきた…。(;_;)


